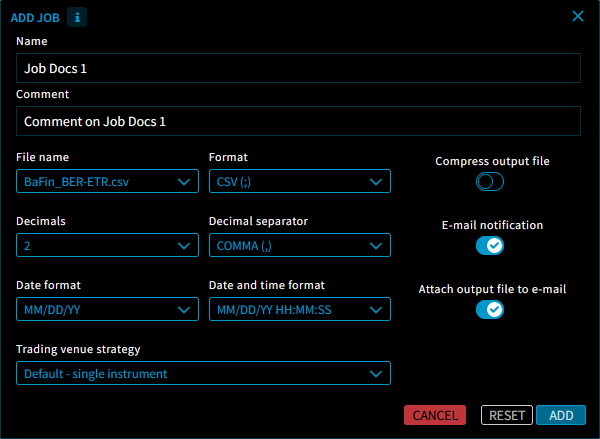
Add job
On the "Jobs" tab, you can create new jobs for the currently selected client. To do this, follow these steps:
- Select the "Add job" button.

This opens the "Add job" dialogue window.
- Enter the desired data in the "Add Job" dialogue window.
- Once you have made all the entries, close the "Add job" dialogue window with the "Add" button.
The job is added to the list of jobs and is given a unique job ID.
To create more jobs, repeat steps 1 to 3.
In detail, you can enter the following data for the job in the "Add job" dialogue window:
| Element | Description |
|---|---|
| Name | Enter the name of the job here. |
| Comment | Enter an (optional) comment on the job here. |
| File name | From this drop-down list, select the relevant file name. The files previously uploaded to the SFTP server are displayed. |
| Format | Select the desired file format from this drop-down list. The following formats are available:
|
| Decimal places | Select the relevant number of decimal places from this drop-down list. There is a choice of 0 to 8 decimal places. |
| Decimal separator | Select the desired decimal separator from this drop-down list. The following separators are available for selection:
|
| Date format | Select the desired date format from this drop-down list. |
| Date and time format | Select the desired date and time format from this drop-down list. |
| Trading venue strategy | Select the desired trading strategy from this drop-down list. By default, you can select from the following strategies:
|
| Compress output file | Turn this switch to the right to compress the file format (format *.gz). |
| E-mail notification | Turn this switch to the right if you want to notify the e-mail addresses stored in the configuration when this job is executed. |
| Attach output file to e-mail | Set this switch to the right to attach the output file to the e-mails. This switch is only visible if the "E-mail notification" switch is activated.
Note that the file size for such attachments here is limited to less than 50 MB.
|
